Tutorial - Image feature extraction
Setup
This tutorial should be placed in the same directory as the COSIE model package.
COSIE extracts superpixel-level image features using a hierarchical strategy based on the UNI foundation model.
To proceed, users should first obtain access to the pretrained UNI model.
GitHub repository: https://github.com/mahmoodlab/UNI
Hugging Face model: https://huggingface.co/MahmoodLab/UNI
Example images for this tutorial can be downloaded from: https://drive.google.com/drive/folders/17ZkFsz29eI6xrBveDXKhnslt1_j0L5lX?usp=sharing
After downloading, images should be placed in the same directory as this tutorial script.
[1]:
import cv2
import numpy as np
import matplotlib.pyplot as plt
from sklearn.decomposition import PCA

from COSIE.image_preprocessing import *
from COSIE.downstream_analysis import cluster_and_visualize_superpixel
/home/weili97/miniconda3/envs/py39/lib/python3.9/site-packages/tqdm/auto.py:21: TqdmWarning: IProgress not found. Please update jupyter and ipywidgets. See https://ipywidgets.readthedocs.io/en/stable/user_install.html
  from .autonotebook import tqdm as notebook_tqdm
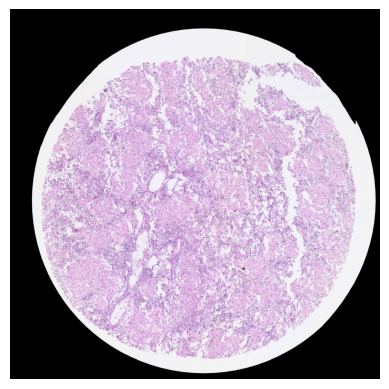
Load image (B-cell lymphoma as example)
The resolution of this example image is 0.5 microns per pixel.
Users may optionally rescale their images using the rescale_image function in the image_preprocessing module.
[2]:
he_image = load_image('HE.jpg')
he_image.shape
loading image...
Image loaded from HE.jpg
[2]:
(4000, 4000, 3)
[3]:
plt.imshow(he_image)
plt.axis("off")
plt.show()
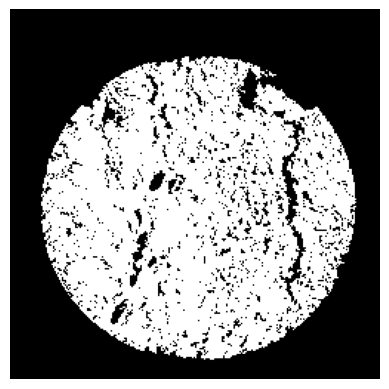
Input the mask file
The mask file was generated using customized algorithm HistoSweep, and it can also be created using image editing software such as GIMP.
Only the white 16×16 superpixels in the mask will be retained, and COSIE will extract image features exclusively from these superpixels.
[4]:
mask_image = cv2.imread('Image_mask.png', cv2.IMREAD_GRAYSCALE)
mask_image.shape
[4]:
(4000, 4000)
[5]:
plt.imshow(mask_image, cmap='gray')
plt.axis("off")
plt.show()
Generate the pixel locations of valid 16×16 superpixels.
[6]:
centers = get_white_superpixel_centers('Image_mask.png')
centers = np.array(centers)
centers = centers[:, [1, 0]]
spatial_location = (centers - 8) // 16
spatial_location
print(f"Find {len(centers)} superpixels")
Find 29398 superpixels
Extract Image Features using UNI
COSIE provides a function image_feature_extraction to extract features from H&E images.
Required Inputs
he_image:The input H&E image, provided as a NumPy array of shape(H, W, 3)representing an RGB image.uni_local_dir:Path to the directory containing the pretrained UNI model weights, e.g.,pytorch_model.bin.After obtaining UNI access, this file should be available locally.cell_location:An array of shape(N, 2)containing the pixel coordinates(x, y)for superpixel centers. COSIE will extract features centered around these coordinates.
Optional Parameters
device:The device used for inference. Use'cuda:0'for GPU inference or'cpu'if no GPU is available.batch_size:The batch size used during feature extraction.
After training, a file named UNI_embeddings.pkl will be saved in the same directory.
[7]:
uni_local_dir = '../UNI/assets/ckpts/vit_large_patch16_224.dinov2.uni_mass100k/'
[8]:
image_feature_extraction(he_image, uni_local_dir, centers)
cell num: 29398
/home/weili97/aa_Final_version_COSIE/COSIE/image_preprocessing.py:320: FutureWarning: You are using `torch.load` with `weights_only=False` (the current default value), which uses the default pickle module implicitly. It is possible to construct malicious pickle data which will execute arbitrary code during unpickling (See https://github.com/pytorch/pytorch/blob/main/SECURITY.md#untrusted-models for more details). In a future release, the default value for `weights_only` will be flipped to `True`. This limits the functions that could be executed during unpickling. Arbitrary objects will no longer be allowed to be loaded via this mode unless they are explicitly allowlisted by the user via `torch.serialization.add_safe_globals`. We recommend you start setting `weights_only=True` for any use case where you don't have full control of the loaded file. Please open an issue on GitHub for any issues related to this experimental feature.
  model.load_state_dict(torch.load(os.path.join(local_dir, "pytorch_model.bin"), map_location="cpu"), strict=False)
Finish loading model
shape_ori: [4000 4000]
0%| | 0/230 [00:00<?, ?it/s]
Batch 0:
Shape of patches: torch.Size([128, 3, 224, 224])
Shape of positions[0]: torch.Size([128])
Content of positions[0][:10]: tensor([520, 520, 520, 520, 520, 520, 520, 520, 520, 520])
Content of positions[1][:10]: tensor([1896, 1912, 1928, 2088, 2104, 2168, 2184, 2248, 2264, 2280])
0%|▏ | 1/230 [00:02<10:22, 2.72s/it]
Shape of feature_emb: torch.Size([128, 197, 1024])
Shape of patch_emb: torch.Size([128, 1024, 14, 14])
100%|█████████████████████████████████████████| 230/230 [06:54<00:00, 1.80s/it]
uni_embeddings.pickle
Load image feature
[9]:
image_feature = load_pickle('uni_embeddings.pickle')
image_feature = np.array(image_feature)
image_feature.shape
Pickle loaded from uni_embeddings.pickle
[9]:
(29398, 2048)
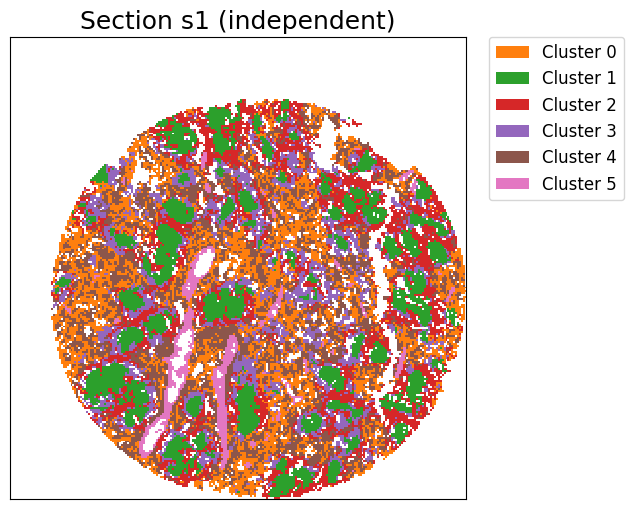
Perform clustering and visualization
[10]:
pca = PCA(n_components=50)
image_feature_pca = pca.fit_transform(image_feature)
[11]:
adata_img = sc.AnnData(X=image_feature_pca)
adata_img.obsm["spatial"] = spatial_location

data_dict = {'HE': [adata_img]}
img_data = {'s1':image_feature_pca}
[12]:
cluster_label = cluster_and_visualize_superpixel(img_data,
                                                 data_dict,
                                                 n_clusters=6,
                                                 mode="independent",
                                                 vis_basis="spatial",)
Perform independent clustering...
[ ]: